Apache Server: KeepAlive, good practice

The KeepAlive parameter is more important than you might actually think, we learnt the hard way. Many good articles have discussed the KeepAlive topic (e.g. KeepAlive On/Off) with good arguments. Here I’ll present rather a summary.

I personally set up our apache server for development machine in EC2/VPC (Amazon Web Services). I set up the KeepAlive parameter to On because we were concerned with speed more than with memory. The server was running fine with sometimes Apache taking spikes in memory usage. The problem started when our blog began to increase traffic and suddenly it was practically impossible to connect  to the server, it was running low in memory with Apache taking up to 1GB in memory! And as usual in the worst moment! The first time, a graceful restart of Apache fixed the problem but it was just getting worse.

How much traffic did it take? Not that much, a simple Apache Benchmark test with 20 concurrent connections and 50 queries was enough to render the server unusable.

ab -c 20 -n 50 http://our-server/

Just imagine several (smart) spiders hitting your server, that would be it.

Then, I had to set the KeepAlive value to Off, the requests take a bit longer but our server now can take much more. You can fine tune the worker values too.

sudo vi /etc/httpd/conf/httpd.conf; # in CentOS and set: KeepAlive Off

Conclusion, if your going to expose your server to a broad audience set KeepAlive to Off. However, if you rather control the amount of traffic and the authorised host/machines that connect to your server, then you might set KeepAlive to On.

As a final advise, block common attacks to your server. I personally use the script that is also used in phpmyadmin. See below, you can add it to your VirtualHost configuration or to an .htaccess file.

# Allow only GET and POST verbs
RewriteCond %{REQUEST_METHOD} !^(GET|POST)$ [NC,OR]
# Ban Typical Vulnerability Scanners and others
# Kick out Script Kiddies
RewriteCond %{HTTP_USER_AGENT} ^(java|curl|wget).* [NC,OR]
RewriteCond %{HTTP_USER_AGENT} ^.*(libwww-perl|curl|wget|python|nikto|wkito|pikto|scan|acunetix).* [NC,OR]
RewriteCond %{HTTP_USER_AGENT} ^.*(winhttp|HTTrack|clshttp|archiver|loader|email|harvest|extract|grab|miner).* [NC]
RewriteRule .* - [F]

Hope it was useful and do not forget to optimize your server!

Amazon EC2 Attach Elastic Network Interface (VPC)

We are running our Virtual Private Cloud (VPC) using Amazon Web Services (AWS). In this particular case we wanted to add an extra network interface to one of our servers which is an Amazon AMI (CentOS). This should be an easy task that should take 10 minutes but you need to be careful, otherwise you’d spent much more time.

The first step is to attach an Elastic Network Interface (ENI) to your instance. This can be accomplished using the Amazon console, first, creating a new interface (if you don’t have one available) and then attach it either when launching a new instance or when your instance is stopped.

Next, attach an Elastic IP Address to your interface (if you need to). Up to this point your instance should have two network interfaces, each with an elastic IP.

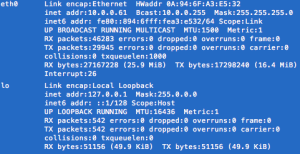
Connect to your VPC instance as usual and run a ifconfig command in your shell to see the list of interfaces.

ifconfig

What you see next is the default interface (eth0) and the loopback one. then you need to create an interface manually (e.g. eth1) which is rather straightforward.

Edit: There is no need to create manually an interface configuration, Amazon provides the ec2-net-utils to do that task for you. Issue the command below to configure and bring up your new interface.

sudo ec2ifup eth1  
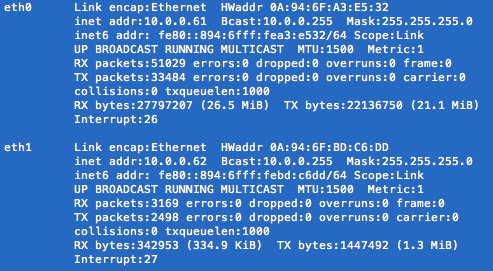
ifconfig

You shall see your new interface listed as eth1 as in the image below (or eth2 as it might be the case) and it’s now reachable from other hosts in the same subnetwork (or the internet if using an elastic IP attached to it).

If you do a mistake you can bring the interface down with the command counterpart:

sudo ec2ifdown eth1

.

Run the commands below to add a network interface to your instance.
cd /etc/sysconfig/network-scripts
sudo cp ifcfg-eth0 ifcfg-eth1
sudo vi ifcfg-eth1

The *only* parameter you need to change is the device
DEVICE=eth1
(i.e. setting the name). Save the changes and quit the editor.
Finally, it only remains to restart the network:
sudo /etc/init.d/network restart
If you run again
ifconfig
, you should now see your new interface in the list.

For a longer explanation on how to setup an interface in your instance, have a look at this tutorial.

That’s it, you should now have both of your interfaces working but for security, check if you can connect/reach both interfaces (e.g eth0 and eth1 in the example). If you ever find a problem such as only one interface being reachable/functional then go to your Amazon console Detach and Reattach the new interface (ENI) and run the ec2ifup command, check also your firewall settings.

For a longer explanation of ENIs and the ec2-net-utils you can refer to the EC2 user guide.

Thanks for reading, hope it helps somebody

preg_replace compilation failed (Amazon EC2, WordPress)

We have an Amazon EC2 AMI (Linux) hosting the latest WordPress installation (3.4.1) at this point in time. All the configuration was running fine till an upgrade that introduced a PHP warning:

« Warning: preg_replace(): Compilation failed: unknown option bit(s) set at offset 0 »

The first time I noticed it, I didn’t pay that much attention since the WordPress administration was still working besides the warning but some other functionality like the shortcodes was not.

The problem arose when we needed the GD library to generate png and jpg images on the fly which, is used in a WordPress theme. By doing a simple install of the library (php-gd.x86_64, for our system) several dependencies were upgraded to newer versions (php, php-cli, php-common, php-mysql, php-pdo). The install finished normally without any warnings to be worried about.

After a while digging in Google, I found this post which was having a similar problem and most importantly it hinted that the problem was the PCRE library (libpcre), which was being loaded differently (different versions) in the apache and commandline modes. Running the php code below in command line and a web page would show that:

php_info();

The same post mentioned that a libpcre upgrade would fix the problem. Thus, I went for the upgrade from version 7.8-3.1.8 to version 8.21-5.3 in our Amazon Linux instance running the following commands:

sudo yum search libpcre # Find the library
sudo yum install pcre.x86_64 # Install the right library.

If you’re running a different linux system other than the Amazon Linux AMI or CentOS you might refer to your docs. For example in Ubuntu the package manager is apt-get.

This should never have happened if the dependencies were checked correctly during the GD library install. Maybe the libpcre version was not considered as needing an upgrade. Anyhow, I hope this helps others to save some time fixing this problem.

If you have any comments or further information on this issue, I’d appreciate if you let me know.